I'm a prompt! I'm a prompt!
OK, so here's the story: In one of the groups I'm in on Facebook (M3 shout out!!!), we were having a discussion about layers. They are awesome! Yes...BUT they are not the easiest thing to learn! So, one of the ladies was asking about how people in the group do layers. And as it turned out, we all had layer issues! I'm so happy, because I thought I was the only one! Layering has been on my ever growing list of things I need to work on for a LONG time. But I have been practicing...
I am DEFINITELY NOT an expert (at anything...besides maybe practicing...), but I mentioned that one thing that is helping me is to start out with things I don't really like. I mean, you don't want to cover up beautiful gorgeousness, right? Because then you could mess up your totally awesome whatever-it-is and be really sad! However, if you start out with something you're not really a fan of, and you mess it up, it's not really a loss, because you didn't like it (and, let's be honest, if you don't like it, you'd never use it anyway). So, to my shock and glee, they made that into a prompt, to work on layers by starting out with something you don't like. (I actually can't leave my craft room because my head won't fit through the door!)
What I thought I would do is take some pictures to show how I arrived at the end result...so here you go:
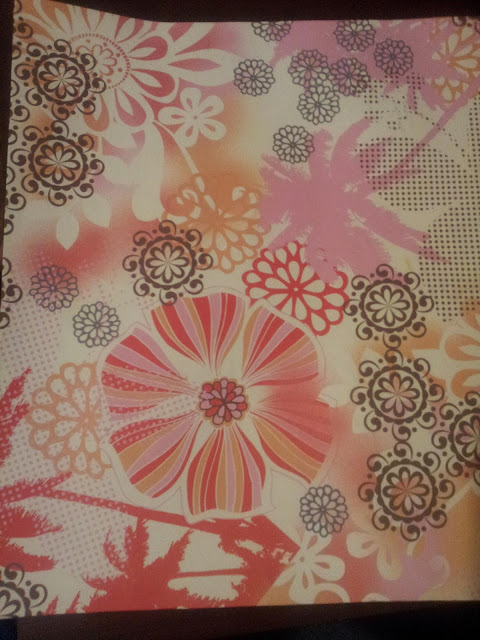 |
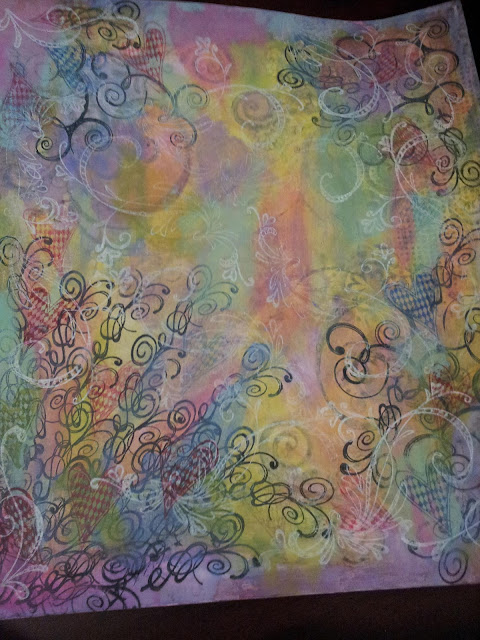
This is a piece of scrapbook paper from one of the first paper pads I ever bought. The rest of the paper from this pad is pretty awesome, but this page has always made me gag. I don't know why, but I REALLY dislike it.
For the first step I glued this (HIDEOUS) paper to a piece of thin cardboard (think cereal box weight). |
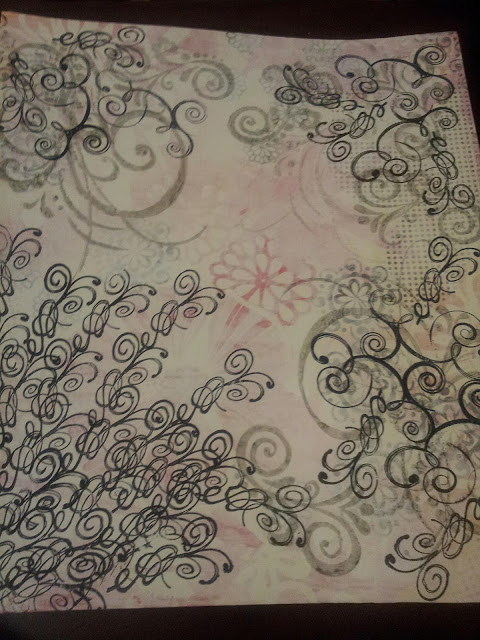 |
| The next step was to apply a thin coat of gesso to try to tone down the brightness of the paper (did I mention how ugly the paper was to me...oh lawd, so ugly!) After the gesso was dry, I used a large scroll stamp I had and some Dove Gray Stazon ink for the next layer. Then, I used Jet Black Stazon and a few different scroll stamps over that. |
 |
| In this step, I used several different colors of Distress Stains to add some color to the gesso. For the record, Distress Stains are REALLY awesome, and one day, I will own all the colors. At this point, I decided I was going to do a girl (because what do I make besides girls, really?)... |
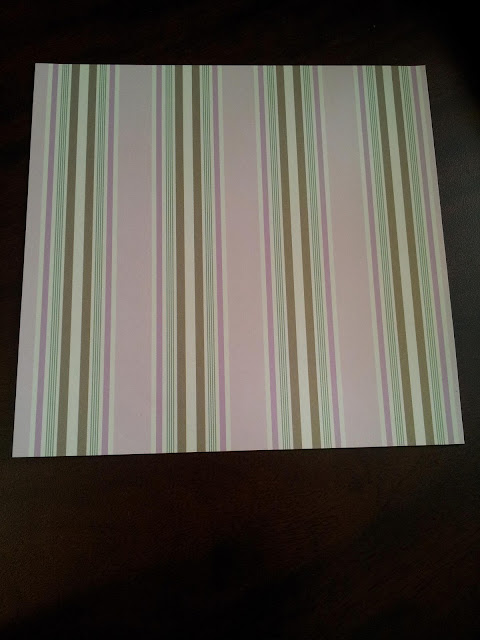 |
| So, since I decided I was going to do a girl (something I do A LOT), I thought I would change her up a little bit and try some things I don't usually do...and that's where this scrap piece of paper came in... |
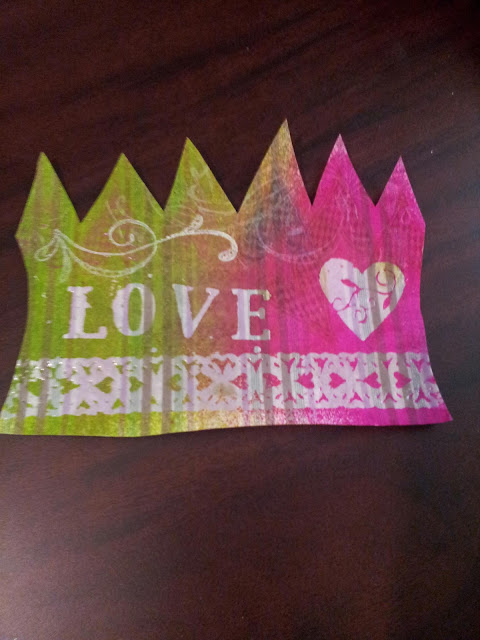 |
| First, I embossed some stamps onto the page...well actually I cut out the shape first...but then I embossed with clear UTEE. Then, I used some Dylusions spray inks to color in the piece. Because of the embossing powder, the stamped images resisted the color, and so the images really stand out. Then I added some more stamps (there's a heart one that blends into the background and then the white scroll thing). (This is the point where I took the above picture.) But, this looked too bright for what I had in mind, so I toned it down with some of the White Linen Dylusions. |
 |
| While waiting for that to dry, I set about adding paint to the background, followed by the heart stamp, and then followed by the white stamp as well. I kind of wanted to stop here, but seeing as how this was about layers and all for practicing, I went ahead with my plan to put a girl on the page. |
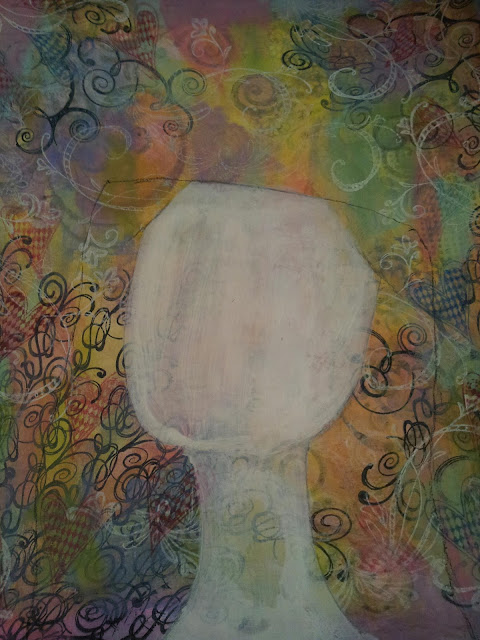 |
| I made a quick sketch of a girl face outline, took a little bit of gesso and painted her in. I only put gesso on the actual face/neck part, because I was hoping to preserve some of the background (which makes me super happy!)... |
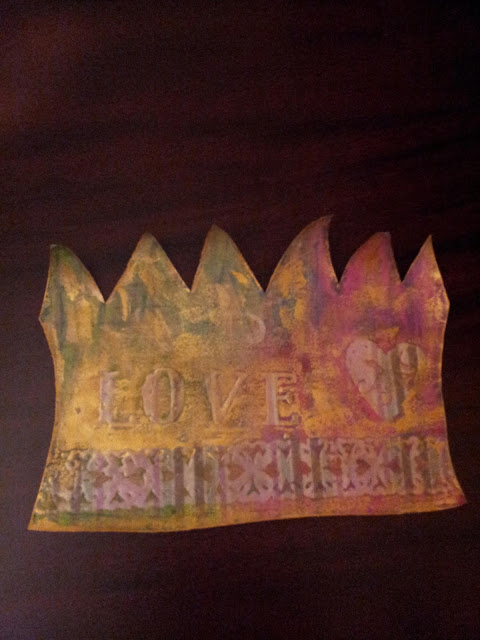 |
| While waiting for the gesso to dry, I kept looking at this piece of scrap and decided that, even after I added the white Dylusions, I STILL didn't like how it looked in relation to everything else, so I went over it with some Inka Gold Metallic Rub in Gold. That stuff is pretty darn awesome by the way... I ended up liking this part much better after adding the Inka Gold. This is the point where I got REALLY into it, and forgot to take anymore pictures until I was done...but you didn't actually miss that much craziness...or at least none that you really need pictures of for explanation... |
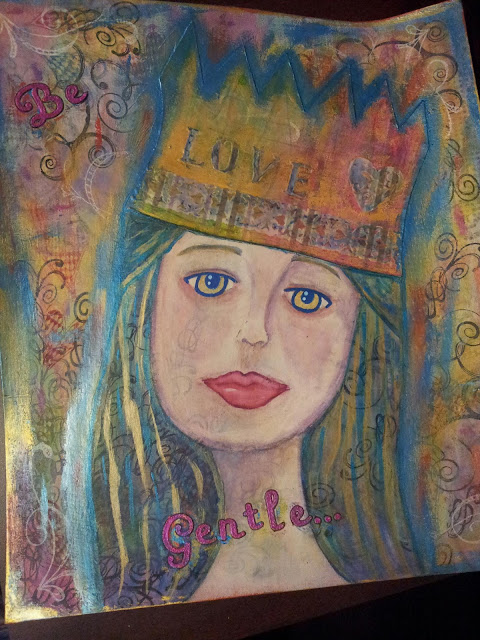 |
| After the gesso was dry, I lightly drew in some features in charcoal. I used some Letraset Aquamarkers to colorize. Those things are so amazing it HURTS!!! I will TOTALLY be having all the colors of the Aquamarkers...I know I said that about the distress stains, and one day I will...but the Aquamarkers...I will be owning all of those REALLY soon! Basically, Aquamarkers are watercolors in marker form, but they are so amazing that I think they are actually made up of fairy dust and love from puppies. I LOVE THEM!!! ...ok, I'm good now. I digress. After I finished the face (and the Aquamarker celebrating...it was the first time I used them, I just got them yesterday), the hair looked a little flat and so I took some of the Inka Gold in Gold and added some hair lines. I also added some Aquamarkers to the embossed areas of the crown because they were sticking out like a sore thumb...the Aquamarkers tamed them a little. Then I added some Inka Gold in Gold around the edges and in random places on the page. But I wasn't happy with that, the gold was too overpowering by itself, so I added some Inka Gold in Steel Blue as well. Then I thought I'd really like to have a sentiment. "Be Gentle" popped into my brain. I was having trouble deciding which set of letter stickers to use for this: a set of shimmery black ones or a set of light rose color ones. I chose the light rose ones...I chose poorly. They REALLY blended into the background, and NOT in a good way. So I went over them with some Inka Gold in a couple different colors...and I still wasn't happy with them. Then I thought 'what about using the Silks acrylic glaze?'...because is there anything a little Silks can't do? I used the Jasmine color and that was definitely the right answer. I love those things (and yes, one day, I will have all the colors of Silks as well...) |
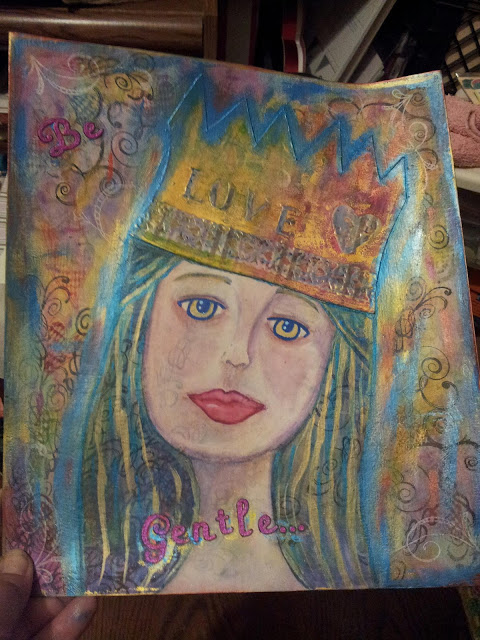 |
| Here's another finished photo, just to show the shiny of it. I am pretty impressed with the end result... While I was looking at this, I realized that I am kind of like Alice from Alice in Wonderland. 'I give myself very good advise, but I very seldom follow it'. Starting out with something you don't like is pretty good advise...but I get lazy and don't practice it as often as I should. Then I look at this and realize that I need to do this kind of thing more...I love how it turned out! I really like that you can see pieces from every layer. There's the hideous scrapbook paper, which you can see on the left side (there are little dots that come through). There's the stamps in Dove Gray and Jet Black. The paint, the white stamps, the crown with the embossing. The Inka Gold in Gold and Steel Blue, and the letter stickers colored in with Silks. I love that you can see some of the stamps coming through on her face and in her hair! |
All in all, I am really happy with the way this turned out! It's significantly better than that (UGLY) scrapbook paper I started out with in the beginning. And since I started out with something I didn't like, I wasn't worried about messing it up. This gave me some extra freedom to experiment and not worry about the end result too much. And I think that made the end result much better. I really feel like I am a successful prompt! I can't wait to see what the other ladies have come up with!
Dear Prompt,
ReplyDeleteI hope you have a bathroom in your craft room since your head is so large you can't get out. You're idea was an excellent one. I love how your page turned out. I like how the stamps show thru on her face and neck too. My favorite line you wrote was that something was made of fairy dust and love from puppies. That is a wonderful description.
That's funny! Maybe my husband will bring me a 5-gallon bucket or something...we'll see how much he loves me... :) Thanks for the compliments! And to Mo for the original question! I get all these brilliant ideas (like start out with something you don't like) and then I do them once or twice and move on...if it weren't for Mo and the challenge, I wouldn't have done this page for sure (I get lazy and don't want to pull out supplies sometimes...like rubber stamps...and I LOVE rubber stamps! I'm just lazy...)and that's a shame, because sometimes it turns out really well! Those Aquamarkers really are made from fairy dust and love from puppies! They are awesome!
DeleteThanks for sharing your process of layering. Your little princess is just adorable!!
ReplyDeleteHave a nice Sunday
Gabriele
Thanks Gabriele! <3 <3 <3 I am happy with how it turned out...it's much better than what I started with anyway! :) I hope you are having a good Sunday too!
DeleteAbsolutely love the way it turned out! and that ugly piece of paper you started with..I own it too and now I know what to do with it!
ReplyDeleteThat's so funny! It's a small world (of craft supplies) after all... :) If you have the whole paper pad, you know the rest isn't so bad...I really like some of the pages a lot...but oh dear goodness, I have loathed that page SO MUCH! I'm happy it is gone now! I hope you will try this with your page too! If you do, I hope you'll tag me in it so I can be sure to see! <3
DeleteSweets, this is absolutely gorgeous. Boo and I were on the same wavelength... I did a "Copy and Paste" of the words "made up of fairy dust and love from puppies" to use as a description of this page. Thanks for posting the steps. I liked the paper before the additions, but I FREAKIN' LOVE the created page. Beauty!!! Hugs, Pamikins
ReplyDeleteThanks Pamikins!!! I need to take my show on the road I think...people from all over are laughing at the same things...clearly I have an audience! :D But it is true, those Aquamarkers are stinking awesome! I will check and see if I have another page that looks like that one (I think my sister grabbed it, but I'll check) and if I have it I'll send it to you...I will be happy to be entirely rid of that awful page! Love ya! <3
DeleteWow, this is really clever! When I started reading this post I thought you were talking about Photoshop layers - which completely blow my mind and I have never got to grips with and never really known whether I care or need to know about Photoshop anyway as I never use it but sometimes kind of wonder if I should etc :) But reading about all this layering process you use has introduced me to a whole new world of artistry! And you are very very good at it! Really lovely page. xxx
ReplyDeleteThank you! I'm with you about Photoshop...other people do AMAZING stuff with it, but honestly, I would probably hit the wrong button and blow the computer up or something! I don't even think my dinosaur computer can handle Photoshop...so my computer would probably blow up before I even had a hand in it! :) The layering is definitely good for covering up ugly stuff! I can't start out with something pretty AT ALL, because I'm scared to mess it up...but if it's ugly to start out with I don't mind...that's the secret, I think... Thank you again! I hope you and the baby are doing well! I miss seeing your art and would love a baby update too! I know you are probably busy with Momma duties and I know you are doing great at being a Momma! <3
Deletewhat you say about starting with something ugly reminds me of how good it is when you have a page in your sketchbook which you were on the verge of tearing out and then you manage to pull it back and work it up into something nice - which is what I have been trying to do lately as I have some very dreadful pages in my sketchbook.
DeleteThanks for that, we are doing pretty well. I have been checking in/stalking from afar your (and other people's) blogs and have done a few bits in my sketchbook. They're pretty lousy. I need to scan them in but the scanner is right behind Alexander's bouncy chair so every time I think I might have a few moments to do some scanning is when I can't get at the scanner. Hopefully will get a new phone soon with a better camera which might make life easier in terms of blogging/uploading photos.
Keep up the good work! x
This is so beautiful Sweets and I love how you explained all your layers! Your writing is also so awesome! Hugs to you! <3 Cheryl
ReplyDeleteThank you! I hope it was helpful! I don't know if I do it right, but that's how I do it...the super easy way! And if its still ugly, you just add another layer!
DeleteI love this! Sweets, I'm seeing if I can post as Anonymous. I so love this page! Cheryl McKenney
ReplyDeleteHello Anonymous Cheryl! You are making me giggle...
DeleteSweets, I love the girl's face! I must try out those Aquamarkers and also your Dylusions coloring is fabulous!
ReplyDeleteI'm doing this post again as Kollage Girl ~ :) Cheryl
They sell the Aquamarkers at Michaels, Amazon, and Dick Blick (Dick Blick has them as singles, so you can pick just a few colors the others have them in packs...). They really are cool! I am working with them and discovering more and more...by this time tomorrow,(so long as the package comes I will have ALL the colors...shh! Don't tell on me! :) Then that is the LAST art supply I buy for a good while...
DeleteI do love the Dylusions...you really can't go wrong with them! They all look awesome together...ok, my one stipulation to no more art stuff is I will totally buy more Dylusions when they come out with new colors...and the Distress Stains are awesome too...ok, those are my two exceptions...Dylusions and Distress Stains...other than that, NO MORE BUYING for a LONG time!!! :) (Be strong, self, be strong...) Love you! <3
Awesome post and awesome blog! :)
ReplyDeleteThank you so much! I am glad you like them (post and blog) and I hope you will come visit again! <3
DeleteWhat a gorgeous piece! Love your turorial on it as well.
ReplyDeleteThank you so much! I hope the little tutorial is helpful! <3
DeleteOmg this is Beautiful! Thank you so much for putting all the ingredients down too ;D
ReplyDeleteThanks so much! <3 I hope somebody can use all that blabby info! I know I am still not the best at layers, but if I can spit out what I have learned so far, maybe it will help someone who is just starting! :) It can all be a little intimidating in the beginning...when really its easy peasy, and just a matter of trying and then learning to hide the bad bits! I WISH I knew that at the beginning!
Delete